반응형
모든 메서드의 실행 시간을 측정하는 기능이 필요하다면?
공통 로직이 모든 메서드에 들어가야만 한다. try-finally 등의 구문을 써야하기 때문에, 메서드로 따로 뺄 수 있는 로직도 아니며, 로직의 중간에 삽입되어야 한다. → 핵심 비즈니스 로직과 공통 관심 사항이 하나로 섞여서 유지보수하기 어려워진다.
하지만 이러한 기능은 핵심 비즈니스 로직(핵심 관심 사항; core concern)이 아니다. == 공통 관심 사항(cross-cutting concern)
이때 핵심 관심 사항과 공통 관심 사항을 분리하여, 공통 관심 사항을 구현하여 처리하는 AOP를 쓰면, 개발자는 핵심 비즈니스 로직의 구현과 유지보수에만 집중할 수 있게 된다.
AOP
Aspect-Oriented Programming
@Aspect
package hello.hellospring.aop;

import org.aspectj.lang.annotation.Aspect;

// src/main/java/hello/hellospring/aop/TimeTraceAop.java
@Aspect
public class TimeTraceAop {
	... // 공통 관심사 기능을 구현하는 부분
}공통 기능으로 사용할 클래스에 aspectj API의 @Aspect 어노테이션을 붙인다.
package hello.hellospring.aop;

import org.aspectj.lang.ProceedingJoinPoint;
import org.aspectj.lang.annotation.Aspect;

// src/main/java/hello/hellospring/aop/TimeTraceAop.java
@Aspect
public class TimeTraceAop {
    public Object execute(ProceedingJoinPoint jointPoint) throws Throwable {
        long startMs = System.currentTimeMillis();
        System.out.println("START: " + jointPoint.toString());

        try {
            return jointPoint.proceed(); // proceed: 다음 메서드로 진행
        } finally {
            long endMs = System.currentTimeMillis();
            long elapsedTime = endMs - startMs;
            System.out.println("FINISH: " + jointPoint.toString() + " " + elapsedTime + "ms");
        }
    }
}
이제 공통 기능으로 사용할 메서드를 정의한다. 이 노트에서는 메서드의 실행 시간을 측정하는 기능을 정의한다.
이 메서드는 ProceedingJointPoint를 파라미터로 받으며, Throwable을 던질 수 있다.
기본적으로 시간 측정은 try-finally 구문이며, try문 내에서 다음 메서드로 실제로 진행하게 하는 proceed 메서드를 이용한다.
AOP도 스프링 빈으로 등록되어야 스프링이 컨테이너에서 관리하고 인식할 수 있다. 따라서 스프링 빈으로 등록해준다. 이를 위해 @Component 를 쓰거나, @Configuration + @Bean을 이용한다.
package hello.hellospring;

import hello.hellospring.aop.TimeTraceAop;
import hello.hellospring.repository.*;
import hello.hellospring.service.MemberService;
import org.springframework.beans.factory.annotation.Autowired;
import org.springframework.context.annotation.Bean;
import org.springframework.context.annotation.Configuration;

// src/main/java/hello/hellospring/SpringConfig.java

@Configuration
public class SpringConfig {
    private final MemberRepository memberRepository;

    @Autowired
    public SpringConfig(MemberRepository memberRepository) {
        this.memberRepository = memberRepository;
    }

    @Bean
    public MemberService memberService() {
        return new MemberService(memberRepository);
    }

    @Bean
    public TimeTraceAop timeTraceAop() {
        return new TimeTraceAop();
    }
}
또는
package hello.hellospring.aop;

import org.aspectj.lang.ProceedingJoinPoint;
import org.aspectj.lang.annotation.Aspect;
import org.springframework.stereotype.Component;

// src/main/java/hello/hellospring/aop/TimeTraceAop.java
@Aspect
@Component
public class TimeTraceAop {
    public Object execute(ProceedingJoinPoint jointPoint) throws Throwable {
        long startMs = System.currentTimeMillis();
        System.out.println("START: " + jointPoint.toString());
        try {
            return jointPoint.proceed(); // proceed: 다음 메서드로 진행됨
        } finally {
            long endMs = System.currentTimeMillis();
            long elapsedTime = endMs - startMs;
            System.out.println("FINISH: " + jointPoint.toString() + " " + elapsedTime + "ms");
        }
    }
}
@Configuration + @Bean으로 등록하는 것이 더 선호되는데, AOP를 만들어 쓰는 것은 정형화된 케이스가 아닌 특별한 케이스이기 때문이다.
@Around("execution( ? )")
해당 공통 기능을 어디에 적용할지를 명시하는 어노테이션이다.
package hello.hellospring.aop;

import org.aspectj.lang.ProceedingJoinPoint;
import org.aspectj.lang.annotation.Around;
import org.aspectj.lang.annotation.Aspect;
import org.springframework.stereotype.Component;

// src/main/java/hello/hellospring/aop/TimeTraceAop.java
@Aspect
@Component
public class TimeTraceAop {
    @Around(...)
    public Object execute(ProceedingJoinPoint jointPoint) throws Throwable {
        long startMs = System.currentTimeMillis();
        System.out.println("START: " + jointPoint.toString());
        try {
            return jointPoint.proceed(); // proceed: 다음 메서드로 진행됨
        } finally {
            long endMs = System.currentTimeMillis();
            long elapsedTime = endMs - startMs;
            System.out.println("FINISH: " + jointPoint.toString() + " " + elapsedTime + "ms");
        }
    }
}@Around를 이용해서 어디에서 실행시킬지에 대한 조건을 명시해준다.
package hello.hellospring.aop;

import org.aspectj.lang.ProceedingJoinPoint;
import org.aspectj.lang.annotation.Around;
import org.aspectj.lang.annotation.Aspect;
import org.springframework.stereotype.Component;

// src/main/java/hello/hellospring/aop/TimeTraceAop.java
@Aspect
@Component
public class TimeTraceAop {
    @Around("execution(* hello.hellospring..*(..))")
    public Object execute(ProceedingJoinPoint jointPoint) throws Throwable {
        long startMs = System.currentTimeMillis();
        System.out.println("START: " + jointPoint.toString());
        try {
            return jointPoint.proceed(); // proceed: 다음 메서드로 진행됨
        } finally {
            long endMs = System.currentTimeMillis();
            long elapsedTime = endMs - startMs;
            System.out.println("FINISH: " + jointPoint.toString() + " " + elapsedTime + "ms");
        }
    }
}
위와 같이 하면, hello.hellospring 하위의 모든 패키지에 적용한다는 의미다. 만약, AOP를 쓰지 않는다면 위 코드를 필요로 하는 모든 다른 비즈니스 로직들에 모두 블렌딩해야 한다. 따라서, AOP를 쓰면 핵심 비즈니스 로직을 깔끔하게 관리할 수 있게 되며, 공통 관심 로직에 대한 변경 사항이 발생하면 위 로직만 변경하면 된다는 이점이 있다.
이제 준비는 끝났다.
서버를 실행시킨 후(HelloSpringApplication.java 실행 후), localhost:8080에서 회원 조회를 해보면 다음과 같은 결과가 나온다.
START: execution(String hello.hellospring.controller.HomeController.home())
FINISH: execution(String hello.hellospring.controller.HomeController.home()) 3ms
START: execution(String hello.hellospring.controller.MemberController.list(Model))
START: execution(List hello.hellospring.service.MemberService.findMembers())
START: execution(List org.springframework.data.jpa.repository.JpaRepository.findAll())
Hibernate: select member0_.id as id1_0_, member0_.name as name2_0_ from member member0_
FINISH: execution(List org.springframework.data.jpa.repository.JpaRepository.findAll()) 124ms
FINISH: execution(List hello.hellospring.service.MemberService.findMembers()) 128ms
FINISH: execution(String hello.hellospring.controller.MemberController.list(Model)) 140ms
Controller, Service, Repository 각각에 대해서 알아서 적용된 것을 확인할 수 있으며, 역순으로 FINISH가 완료되면서 시간이 측정된 결과를 확인할 수 있다.
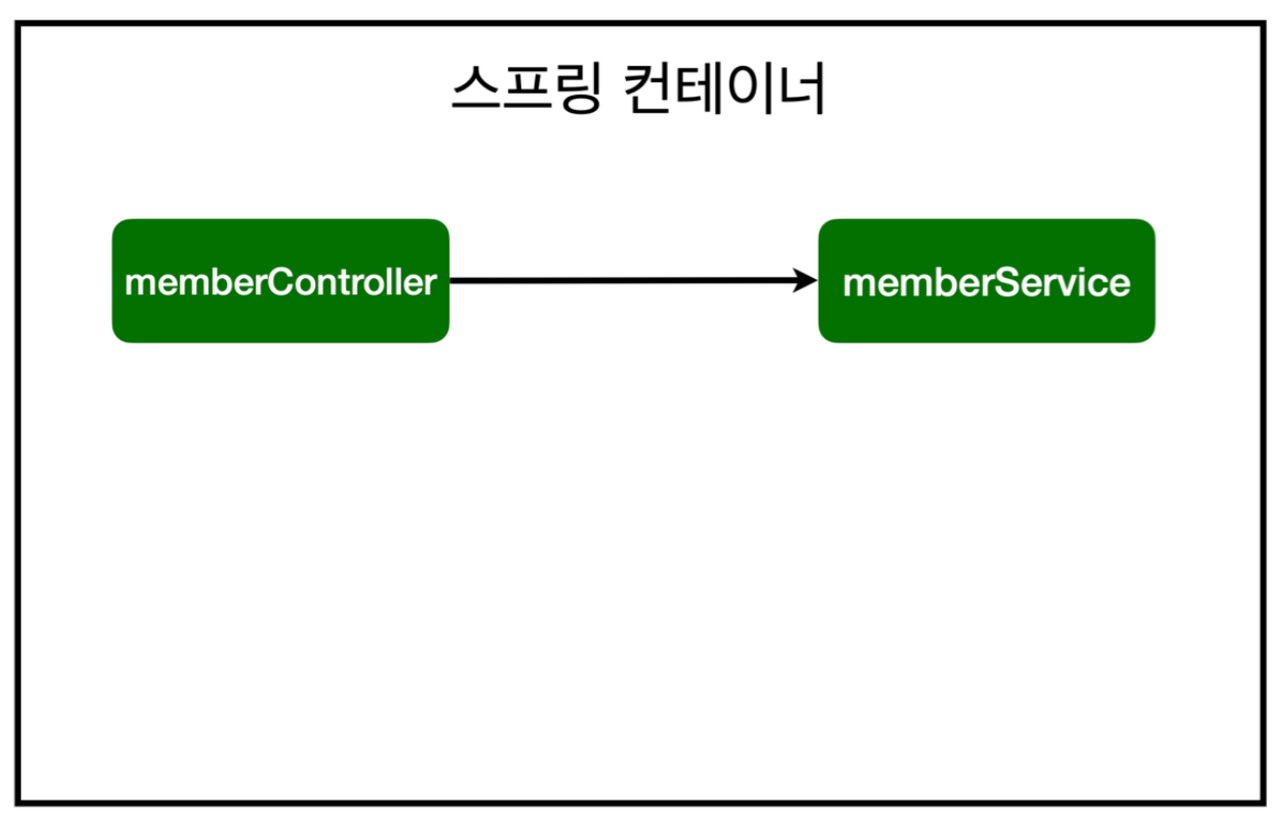
AOP의 동작 원리
AOP 적용 전의 의존 관계는 다음과 같다.
AOP를 적용하면 다음과 같다.
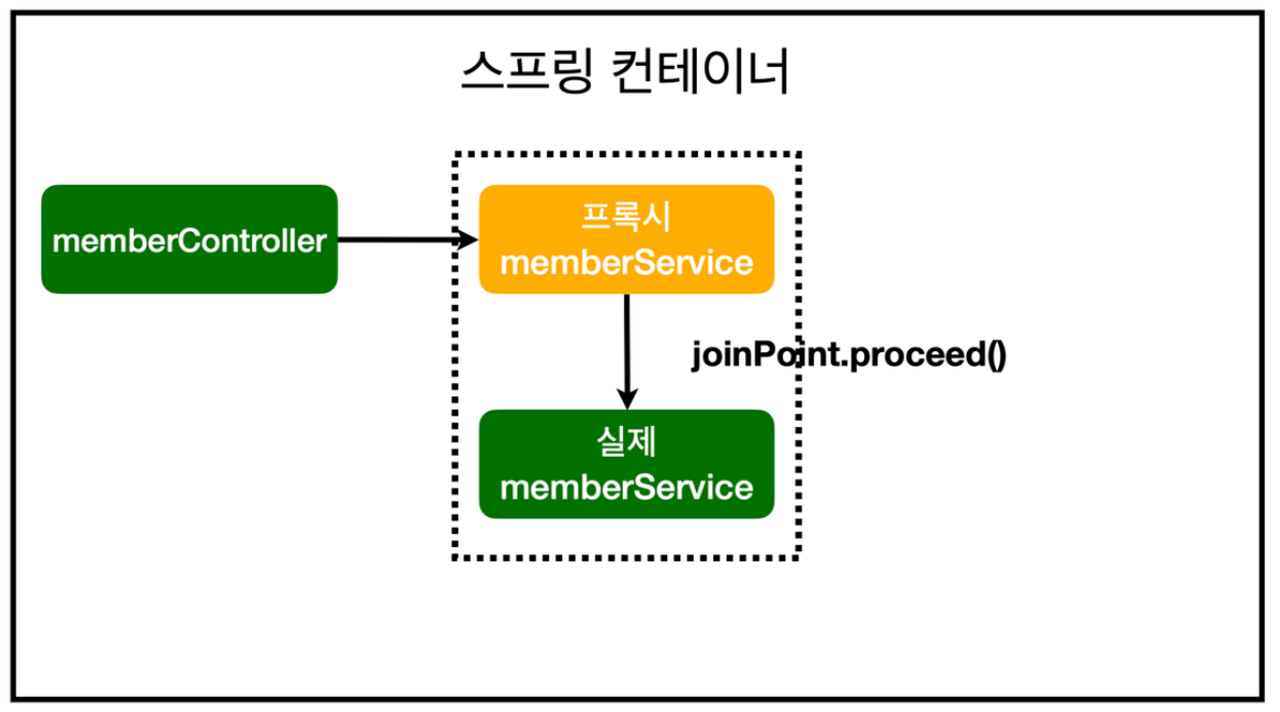
즉, Controller와 Service 사이에 가짜(프록시) Service가 만들어진다. 스프링 빈으로 등록되는 객체도 프록시 객체인데, jointPoint.proceed()가 호출되면 실제 객체가 호출되어 실행된다.
이를 코드를 통해 실제 눈으로 확인할 수 있다.
package hello.hellospring.controller;

import hello.hellospring.domain.Member;
import hello.hellospring.service.MemberService;
import org.springframework.beans.factory.annotation.Autowired;
import org.springframework.stereotype.Controller;
import org.springframework.ui.Model;
import org.springframework.web.bind.annotation.GetMapping;
import org.springframework.web.bind.annotation.PostMapping;

import java.util.List;

// src/main/java/hello/hellospring/controller/MemberController.java
@Controller
public class MemberController {
    private MemberService memberService;

    @Autowired
    public MemberController(MemberService memberService) {
        this.memberService = memberService;
        System.out.println("memberService.getClass() = " + memberService.getClass());
    }

		...
}
memberService.getClass() = class hello.hellospring.service.MemberService$$EnhancerBySpringCGLIB$$8db52b94실행 결과를 보면, CGLIB 라이브러리에 의해 생성된 프록시 객체라는 것을 알 수 있다. 즉, 위 코드의 MemberController()에서 @Autowired 어노테이션을 사용하여 MemberService를 의존성 주입할 때, 스프링은 기본적으로 MemberService 클래스의 프록시 객체를 생성(즉, 원래 객체를 복사하여 동일한 복사본 객체를 생성)하여 주입한다. 따라서, AOP는 더 자세하게 표현하자면 “프록시 방식의 AOP”라고 할 수 있다.
CGLIB(Code Generation Library)은 자바 라이브러리로, 런타임 시에 동적으로 클래스를 생성하고 수정할 수 있게 해준다
반응형
'TIL' 카테고리의 다른 글
| 2023-11-08-TIL | Spring (0) | 2023.11.09 |
|---|---|
| 2023-11-06-TIL | Spring (0) | 2023.11.07 |
| 2023-11-01-TIL | Spring (1) | 2023.11.03 |
| 2023-10-31-TIL (1) | 2023.11.01 |
| 2023-10-30-TIL (2) | 2023.10.31 |


